Bad Habits I Have Had to Unlearn
I started binging leathercraft ASMR content in about September 2019. I got obsessed and started putting together the Master Plan in my notes app of what I would need to buy, in what order, to make a Thing. The algorithm caught wind of this and started feeding me the popular Leather Influencers we have all come to know and.. feel complicated about. Somehow I avoided Reddit until this year, but I wiggled my way into all kinds of corners of the Leather Internet over the following years. I picked up terrible advice early, adjusted with bad advice that was slightly better, and so on. My experience as a beginner in leathercraft was, in some ways, just layers of bad internet advice stacked on top of eachother until I started trying to clean house and get back to basics years in.
I am very lucky now to interact regularly with leather workers producing beautiful, clean work that started two years ago. Two years ago I had already sold a fair amount of really embarrassing pieces (with low prices, to be fair). The point is, some people skipped the bad advice step and are so ahead of whatever curve I have been on. Sometimes this is a real bummer after all the hours I have put in, but the more time I spend being jealous the less time I’m spending on solving the problems I see in my work and the more I limit myself in who I can learn from. Do I enjoy putting on the hat of Experienced Craftsman, or do I enjoy actually crafting beautiful pieces? The reality is the seasoned, wise old leather workers I admire got there by being wrong thousands of time and listening when the solution was offered. Leather work is hard, and when you have ambition in the craft “staying teachable” can be painful sometimes. Reflecting on what mistakes you are repeatedly making and what in your process is causing them is especially humbling.
Enough rambling- this isn’t a food blog. Below is a list of bad habits picked up from various sources online, and that I had some difficulty changing after adopting them into routine or just not wanting to admit I was wrong. In true rambling form, this is a bit long.
1. No notes, no pattern “one-offs.”
I’m not incapable of experimenting, and sometimes ideas come to me so quickly I worry I’ll lose the complete picture I have in my head before I can document the vision I have in my head. This means that I have many times looked at a square, visualized proportions, scribbled numbers down on the back of an envelope, cut some leather, and started assembling. When the piece is done, I either can’t find that envelope or can’t decipher the cryptic measurements. If it goes well, I have to reverse-engineer the item just the same as reverse-engineering from the image in my mind. If it goes poorly, it is hard to investigate why. Did I make a mistake executing the idea or was the idea bad? Who can say?
I recall a high school art teacher assigning my class a series of redundant projects just to drill into our heads the importance of learning to sketch in multiple steps. A quick, impressionist thumbnail to capture the rough outline and mood. The key thing: draw 30 of these. Pick the best 1-3, then let that inform a more detailed sketch—then do 10-20 of these. Then, let the best inform an even more detailed sketch. As you get more detailed you’re dissecting what it is proportionally that is key to the impression in your mind. This makes it easier to pinpoint the ratios of the idea early, quantify the design, to then scale up to the appropriate size. Practicing sketching can improve how accurately you capture the idea in your head, and with practice it becomes much faster than even the most skilled craftsman can make it. Additionally, taking thorough notes, not envelope scribbles, will help you decipher these sketches later.
This is an area where I had learned the correct skills but failed to apply them in the context of leatherwork. Learning from Youtube, I rarely saw much of the design process and when I did it was a simplified version. Additionally, a lot of pattern design in leather work can be the same basic forms repeated with minor changes made at the surface level. A belt, a wallet, a valet tray are all going to repeat the same basic shapes and most designs add only a slight flourish. You could draw out these shapes to scale, add some curves, maybe move a rivet or stitch line a little, and there you go. However, sketching out from scratch gave me so much more freedom to visualize more interesting shapes and capture them without the pollution of previous patterns.
2. “Theoretically centered.”
By “theoretically centered” I am referring to the placement of a hole punch, logo, or letter stamp. For a long time, I had never seen anyone do anything to ensure the punch/logo is actually centered, and it just didn’t occur to me because I had much bigger fish to fry in the precision department. When I fixed a lot of other issues in my work, the logo/punch placement started to stand out as a problem. Then, I never really stopped to think about it and unconsciously decided the solution was just “do better,” not changing the method of finding center. Some people are more naturally gifted at doing this “freehand,” and that’s great, but it is easier to ensure precision with some kind of aid.
With letter stamps: I cut a strip of plastic pattern sheeting from Weaver that is long enough to cross the whole piece, parallel to where I want my line of text. Then I cut the strip’s width to the distance I want between the edge of the piece and the edge of the stamp. I wet the leather, line the strip up to the edge, make sure it’s straight and square, bump the stamp up to the edge of the plastic strip (this is why I use plastic, not paper; it has to be thick enough to do this), make sure it’s square, press down gently, remove the strip, and hit the stamp. My stamp set is cheap and I don’t use it much because I think a foil stamp (out of my budget) would look more appropriate, and the inconsistencies in their machining makes it especially hard to get a straight line. This helps, and I use essentially the same method for stamp placement but I mark the strips center so I have a guide in both axes.
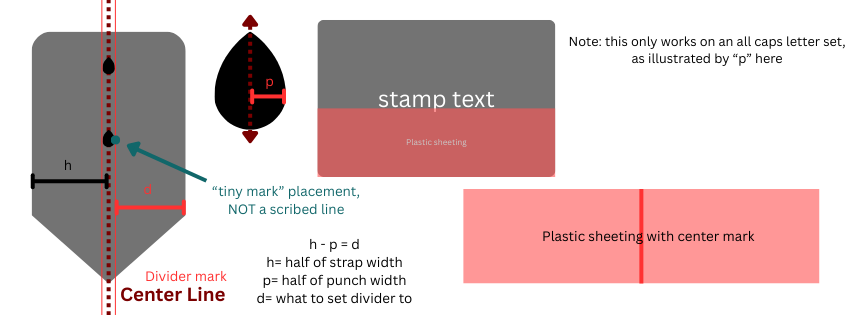
With straps, I measure the width of the punch, divide that in half, subtract that from half the strap, set my divider to that, and make a tiny mark on each side (not a scribed line, as that would remain visible after punching no matter how lightly you scribe.
3. Centering chisel tines on divider line.
It might look straight, you might be good at “theoretically centering,” but it really will be straighter with a more mindful approach. You can lay out the stitch line very neatly and perfectly on a cardstock pattern that you can mark up to your hearts desire, or scribe one line and align the top or bottom of the chisel to the line. I prefer the pattern approach as of this writing, but admittedly sometimes I don’t want to spend that much time on a simple key fob or something and go the other route.
Item #5 on this list includes a diagram illustrating this mistake.
4. Not designing around chisel size/planning chisel placement.
I resisted this concept for years for a few reasons. I am hesitant to think leather can be as precise as other materials, and find some “tricks” fruitless beyond a certain standard of precision due to the organic variation inherent to leather. Chisels are so small, and I didn’t believe that with skiving, burnishing, stretching, etc. that you could maintain enough consistency throughout the process to guarantee each chisel falls exactly in the right place on each piece crafted with a single pattern. Turns out, you can. Aspiring to this standard requires other solutions to other problems but it can be achieved. Of course, higher standards are more complicated and more difficult to achieve.
Alternatively, aside from chisel spacing consistency, accounting for the width of the chisels is essential. For example, let’s say to design a wallet I lay a card down on a piece of paper and trace, figure out how much wiggle I need around the card to figure out (I call this wiggle allowance), then decide on a stitch allowance (distance from the stitch line to the edge), and then trim allowance (an amount added to the final size to trim off after assembly to get a flush edge to burnish). This is how I went about this for years. On the pattern, there would be just a single line indicating the stitch line. This was downstream from centering the chisel on the line, in which case the chisel width subtracted on either side would be minimal (0.5mm if your tines are 1mm). I realized that if I wanted to refine the dimensions, I needed to account for the chisel width. On something as precise as a 16mm watch strap, this minor detail becomes major. I wish I had developed a habit early of considering chisel width. This point is also illustrated below in item #5.
5. Centering pocket tops between two tines.
Alright, let’s look at this illustration because this is hard to describe.
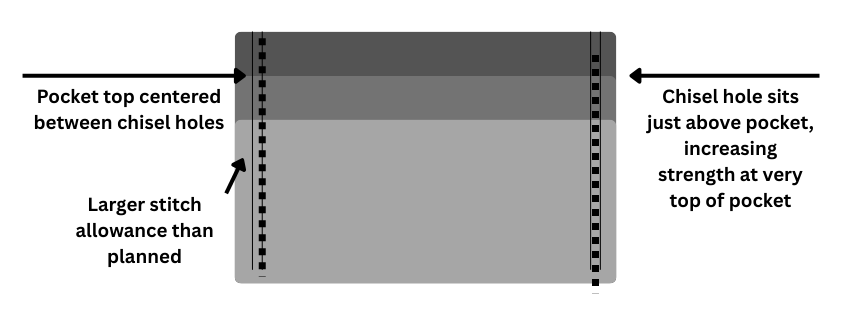
On the left, you can see a number of mistakes I have discussed. The chisel holes (dotted line) are centered on a single line, leaving the other line ignored and stealing some wiggle space from the center. Per this next point, the lines created by the top edges of the pockets are centered between chisel holes, leaving very little “meat” left on the pocket top. This can rip very easily and is a particularly high-stress, common fail point on a wallet. I learned from various YouTubers not to clip the edge with my chisel but many of them suggested centering this line. Taking it a step further with the method on the right, where the chisel tine is bumped up against this line, increased the durability of my wallets noticeably. The difficult thing comes into play when there are multiple pockets in a stack, and to ensure the chisel falls perfectly above each pocket really requires designing very meticulously around the chisel size. I feel that if you’ve covered the basics of the craft, this is a great way to improve the cleanliness of your work and the earlier you can adopt these practices the easier they are to get right.
6. Ritza, huge chisel, huge needle.
So now you have a beautifully chiseled line, what now? I never really considered the next parts being as important to a clean stitch line as they have turned out to be. In his comprehensive Youtube series on stitching, Nigel Armitage goes into spectacular detail on every factor involved in stitching. Chisel size and shape, thread size and shape, and needle size and shape need to complement eachother. If you have beautiful chiseling, then take a huge needle and huge thread to it, it will mush around, stretch, and look bad. Additionally, flat braided thread really isn’t suited to French chisels. This one I just didn’t want to accept for some reason and only recently switched to round thread with French chisels. It was a lot like “eyebrow blindness”—but stitching blindness. It will remain mysterious to me why I thought it looked better to use Ritza with French chisels.
These points may be no-brainers to some, but I say this because I made these mistakes for approximately 3.5 years. I want to add: I often see folks on IG pulling a needle through the leather with pliers. You should never need to do this. You can damage your needles this way or even hurt yourself, but it’s just not necessary. This is an indication your needle and/or thread is too large 100% of the time, no exceptions. If you get into a situation and just need to get the needle out, a piece of rubber works better anyway.
7. Messy, quick, aggressive thread burning.
Many leatherwork influencers make their little lighter case, stitch a line, cut the thread, light it on fire, and mush it around without even looking. Well, monkey see, monkey do. I didn’t know any better and I liked their work. It just doesn’t have to be this messy. Never have I had to stitch a leather good in that much of a hurry. Sometimes I still do this! It is now muscle memory! Take a breath, slow down, and please don’t develop this habit.
8. Chicago Screws: It’s okay to explore other options.
I have never been able to set a double cap rivet without it smushing to one side. I ruined so many projects I had invested time and love by doing this and then failing to cut it out neatly with end cutters. Everyone I learned from at first used these rivets. I then tried brass rivets with washers. I didn’t like the look of copper or how it patinas. I still have never found a way to cut these brass washers besides a jewelers saw. One day I was screwing a watch caseback closed at work and reflecting on the wonder and magic of screws and Loctite when I realized this incredible technology could very easily be incorporated into my leatherwork and I might never need to feel bad about myself again on the account of a rivet.
My point here is not “avoid double cap rivets” but sometimes if you struggle with something, you don’t have to master it. There are many scenarios in leatherwork in which you have multiple options. I love the repairability Chicago screws offer, and if you use Loctite correctly they are extremely strong. It’s about choosing your battles, really.
9. Forgetting to use the tools you have.
I had one beveler for the longest time, and learned from videos in which the beveler size was often not discussed. After acquiring multiple sizes and brands, I realized I was still reaching for the same beveler without pausing to consider what size was most appropriate. This very rarely caused any problems, but I believe this is a relic of the format from which I learned.
There are ways to make a single beveler work across multiple projects, but when you expand your tool selection it is obviously good to pause for a second and remember that you have done so. Use your tools!
The same goes for all the French curve stencils I forget that I have.
10. Not trimming & checking size/placement throughout the process.
There are so many reasons a cut pattern piece can change before assembly that I am not sure how to discuss this without droning on. For the sake of brevity, here is a bullet-point list before I go onto how I should have been responding to these changes all along:
Tooling/stamping—Mushing the fibers down forces them to squish to the side somewhat. The more complex your tooling design, the more stretching outward you will get. Masking tape applied to the back of the piece before tooling prevents this, and I know there are other solutions as well but I don’t know much about it.
Dyeing leather—As dye dries it will cause the leather to curl, shrink, or even stretch depending on how it is dried and inconsistencies in the fiber structure can become exaggerated. This effect can be reduced by avoiding oversaturation of dye, but in my (non-expert) experience, some amount of change will occur in any case.
Sanding and burnishing—Ideally, good burnishing should not have this effect but as you wet the leather and finish the edge, if the piece is held in a curved position or edges are saturated differently than the rest, it will start to deviate slightly from the original shape of the cut pattern piece.
Wet molding—This may be obvious, but it can be hard to gauge how much this will stretch your leather. It’s always best to cut to size after molding.
Re-do’s—If you go to glue a piece to another and it’s not lined up right, you rip it off, and reattach, the stress of pulling the glue apart will stretch your piece.
Skiving—The sharper your knife, the less it will stretch when skiving. However, all leather will stretch from skiving, some more noticeably than others. You need some idea of the pattern to skive at all, so you can’t cut the pattern afterwards.
Solutions: Make sure to make a pattern in the first place, place your pattern over your piece as you go through the processes mentioned above, and if your piece starts to stretch, trim it back to size as you go before assembly. I use trim allowance on almost all of my projects, but even the raggedy skived bits I intend to trim off later need to be the correct shape and size for me to ensure my trimming goes smoothly. Trimming is scary enough under ideal conditions. Additionally, when I burnish the top edges of wallet pockets, sometimes the corners get a little weird, and these corners stretch considerably with skiving. Having a hefty trim allowance applied to my pattern (ex. 5mm) and trimming these weird parts off is much easier at my skill level than trying to avoid stretching completely and it took me a long time to accept that.
11. Skipping the prototyping step.
We can all sit and do the math of the cost of a lined bifold or a crossbody purse. Material cost adds up on some projects and sometimes I am overconfident in my ability to make a new design for the first time. I have many, many, many times used the last of a certain leather on a “one-off” expensive project, or used the full array of fancy materials (Sully liner, stainless steel hardware, nice exterior leather) just to discover at the end I might need to tweak the pattern or improve a process in my assembly.
Sometimes I will make a mockup with newspaper, sometimes it’s ugly scrap, sometimes it’s just plain natural veg. This felt like a waste to me for a long time, but now I find myself talking to someone about their ideal wallet or bag and feel that if I had made these prototypes all along these discussions with clients, friends, family, or even brainstorming with another craftsman would go much smoother.
About four months into the craft, I made myself a belt of natural veg I dyed black. I used leather balm with atom wax as a “top coat.” Two weeks later, I was asked by someone in my neighborhood to make them two brown belts. I did and they paid me well, and then we found out simultaneously that the leather balm was not sufficient as a top coat. They said they didn’t care, but I still feel bad to this day for staining their pants where the belt is worn. Prototyping is important, and you never know what you might discover.
12. Tensioning with the needle.
If you go into a forum with the issue of thread breaking you will get an overwhelming amount of replies telling you to quit tensioning with the needle. I have known not to do this from day one. When I learned to stitch, I struggled so much with pulling the needle through, with not twisting the thread, with remembering the order of operations, that it was very easy to forget how to apply tension properly. In an apprenticeship environment, I assume these bad habits would be caught and corrected very quickly but the trouble with learning at home from the internet is that these errors can solidify into muscle memory far earlier than they are noticed and corrected. It took me a year to get comfortable stitching, another two years to realize how bad my stitching actually was, and yet another year to start fixing the major flaws. Now I’m onto the minor flaws (year 6), but this does not have to be your path, dear reader.
13. Inconsistent stitch tension.
Following the point above, stitch tension is also important. Too much, and holes scrunch and stretch and are prone to breaking or ripping the leather between chisel holes. Too little and your stitches are prone to breaking and protruding from the surface in a lumpy, ugly way. This is another aspect of learning leatherwork that I suspect is much smoother in an apprenticeship environment. I could try to discuss the correct approach to stitch tensioning here, but I feel that video format is better suited and will once again recommend Nigel Armitage’s series about stitching on YouTube.
However, as this is a list of bad habits I picked up in the learning process, I think this is a good point to emphasize within the greater topic of learning to stitch. I sought out the simplest breakdown of the saddle stitch to learn from initially to go easy on myself. I learned it, looked at my results, looked at the stitch line in the video I had learned from, and had no idea what I had done wrong. I strongly recommend taking the time to find a comprehensive tutorial and practice, practice, practice to experiment with more nuanced factors like tension or how to hold the thread, cast vs. no cast, etc. It is much more complicated than it would appear.
14. Uneven glue application.
I thought for a long time that if my glue application is uneven, smushing it down with a bone folder and/or giving it a good smack with a mallet will force the glue to mush around into an even layer, perhaps even squooshing out the sides of the piece. In the pursuit of perfect glassy edges, I kept encountering a gray, globby, depression in the center of my edges between layers of leather in some areas, but not across the whole edge. This is from uneven and excessive glue application. Ideally, you want even coverage and no more than that. I did not notice the effect this mistake has on edges until I put out bigger fires in my edge work, and it was very hard to keep edgework in mind when applying glue.
Also, I don’t use contact cement hardly ever these days because of I find it difficult to achieve an even layer (and I’ve already lost more brain cells than I’d like in my short time on this earth), and I pay much more attention to a thin, even application with Aquilim.
15. No trim allowance.
I cut all my little pattern pieces, glued them together with globby uneven contact cement, then went to town with sandpaper stapled to a stick. I’m glad I was using a flat surface to back the sandpaper, but it didn’t matter. No matter how hard I have tried and no matter how perfect the pieces are cut, I have never been able to line up pattern pieces perfectly enough to get a perfect edge to burnish. I assume die cutting can solve this, but I don’t have that kind of money. I thought that this was the skill to improve. It also never occurred to me how difficult it is to get even glue application over an area 3-4mm from the edge. Now, I work a trim allowance into every pattern and after stitching, I take a wing divider set to the allowance and mark around the edges that I burnish at the end of the process, then check this line with a straight edge, then cut. If you work on holding your knife at the correct angle and making clean cuts, this will get you farther than you can possibly get going to town with sandpaper on a messed up edge. You shouldn’t need to “scrape” with an X-acto.
16. Aligning wallet pocket to bottom, rather than distance from the top.
This mistake maybe isn’t devastating if every other part of the process of making a wallet has gone perfectly, but I think redundancy in my process to ensure precision has been the only way I have achieved consistent results. I have made another little diagram illustrating this point, with the “problem” exaggerated greatly.
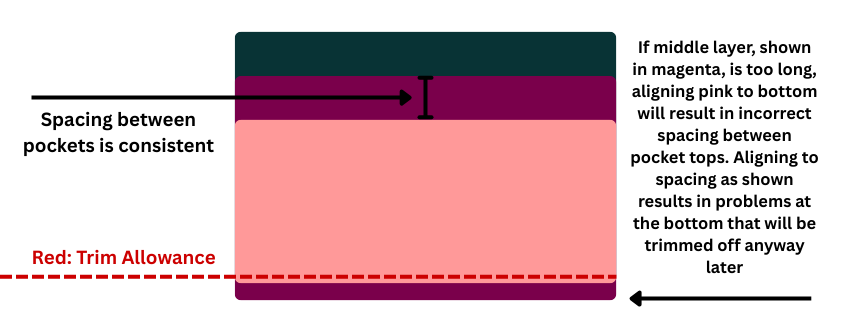
I never have this dramatic a mistake in size, as seen in the magenta layer, because of checking and trimming as I go. But sometimes I cut the green layer too short or something and the error will fall in the area which will be trimmed off. Adopting a system that allows me to line everything up right when glueing even with inconsistent pocket heights has helped me solve problems as they arise without sacrificing quality.
17. Overwetting an edge/working from too much instead of too little.
Every single resource online to learn leathercraft, from blogs and forums to videos, will tell you not to over-wet the edge when burnishing. I have not encountered any that illustrate the appropriate amount with total clarity. To some extent, the perfect amount of water is found through hours and hours of experimentation. I will take a shot at achieving that clarity in the next items of this list, but first I want to talk about how to experiment in the event I fail at showing rather than telling.
When I was learning to burnish, I applied too much water, not realizing how hard it actually is not to over-wet. Then I tried to add a little less, and it was too much. Then I added a little less, and so on. It is so much easier if you work from trying to add as little as you possibly can and increase from there.
However, these next items are important. I don’t apply just regular plain water anymore.
18. Water, then Tokonole. Combine them!
I swear I am planning a series of serious experiments to determine the ideal ratio of water to Tokonole in exact units of measure. For now, I will repeat my unhelpful line about the mix.
I mix Tokonole and water in a little container, and then put them in the little squeezy bottles from RMLS. I eyeball this mixture, and all I know is that it is more than half water by volume. This allows you to dispense both water and tokonole in little beads of goop, which makes it much easier to experiment with and refine the amount applied.
This image, really, is depicting the upper limit of what I would apply to this edge. Any more than this is excessive, and half this amount would likely be adequate. Squeezey bottles do allow for a range of acceptable application, and as you can see it is much easier to see how much you’ve applied.
I work on one side at a time, and I have found these little drops need to be spread across the edge ASAP to avoid oversaturating the area immediately around it. If this happens, darker spots will appear in the edge where the blob was and require redundant sanding to remove.
19. Burnishing following SOP rather than results.
This point can be made about any particular task in leatherwork and pretty much any craft in general. It is important to know why you’re doing any particular thing and how that affects the end result. That kind of understanding only comes from paying very close attention, extensive experimentation, and being willing to make mistakes in order to learn. I’m waxing poetic here, so I’ll get to some more specific, more interesting points:
Water/toko, X grit, water/toko, next grit: When sanding, you should sand in one grit until the edge consistently has that grit’s finish. One way to tell you have achieved this is that sanding more does not result in any change. That is also true when you’re sanding incorrectly, though. Getting a good feel for what the edge looks and feels like when you are truly “done” with a grit is essential to getting good edges. If you sand for a certain amount of time or until some parts of it look a certain way and then move on, you’re going “through the grits” like an SOP rather than following results. I have also found that wetting the edge with water and tokonole swells the fibers, exaggerating high spots and making it easier to knock them down with sandpaper. When this swelling of the edge is repeated multiple times with a single grit of sandpaper, I am able to achieve far more consistent results than I would otherwise. I had heard this advice and figured it made sense after years of burnishing, and never got around to testing it until it was mentioned again in conversation with Historic District Leather. I did it as we chatted and was blown away by the immediate and obvious difference in consistency.
Bevel, sand, burnish: When I started I learned that beveling comes before sanding, so the finish from the sandpaper is applied to the bevel as well, and the bevel is rounded slightly. This is good advice, but not all your sanding has to be done after beveling. If you’re going to use 220, 400, 800, and 1200, I would bevel after 220 grit. This allows you to focus in the coarser grits on getting the edge as flat as possible before refining and beveling. If you bevel before coarse grits like 180 or 220, you risk removing or just reducing the bevel you have applied. This can be used to your advantage if you only have a beveler that is a little oversized, but a sanding block and a great amount of care to the angle you hold it at while sanding is then very important so it is very difficult to achieve clean results this way.
One-size-fits-all burnishing: I have been asked by other leather workers, “What is your burnishing process?” This is almost always asked by people that if asked themselves would say, “Well, burnishing what?”
If I make a wallet entirely out of 0.7mm thick Buttero, I will likely start with 400 grit. In some cases, I discover while trimming that my glue application wasn’t great or the trimming is less than ideal, and I start with 220 grit. I then move on to 600 grit, and end with 1200 grit.
If I make an unlined belt of 7oz (which is thin for a belt, I should say) Buttero, and use the same “method” on this belt as the wallet, I have found the edge is much less satisfying than in the wallet. My thinking here is that the fibers of the hide are most dense at the exterior grain surface, so articles split as thin as the wallet only contain the densest fibers. When you get to 2.8mm of more (7oz or more) from the grain surface, the fibers are noticeably looser. Looser fibers means harder to burnish.
It is discussed a lot on the leather work corners of the internet that different (veg-tan) leathers burnish differently. I have found that Minerva Box does not burnish as easily as Buttero or Pueblo. My point here is that even the same leather from the same tannery can burnish differently in various weights.
I am not happy about this, but I think this means that even more experimentation is needed to consistently achieve good results. The only way I can think to determine conclusively if a coarse grit is redundant or necessary is to use it. I have had to learn over and over that I cannot guess what effect it will have with any more success than random chance. When you buy a new leather, cut off some scrap pieces and do it before doing anything else with the hide. Doing this experiment on a whole belt, or on different sides of the same wallet, is far more annoying to deal with than taking a minute with scrap at first.
This brings me to my last point:
20. Not testing! Not experimenting!
The people you will encounter on the internet while you are learning will appear very confident and they will offer their “knowledge” with a lot of conviction. When you are learning, it can be hard to maintain enough confidence in yourself to question everything you see and hear online. It can be easy to be in a hurry to make something to show around, and then hurry to make something better to redeem yourself. This cycle went on for years for me. At a certain point, I knew I was stagnating but thought I just needed to find a better resource for learning. This might have been true, and I have found some over the years, but I would not have been so dependent on my “teachers” so to speak if I had slowed down and had confidence in my ability to learn by observation. If I had learned to test and experiment, I would have progressed years faster.
Here’s one more little list of mistakes I’ve made, framed as advice:
Struggling with flush cuts? Slow down, watch how you’re holding the knife. Change the blade. Stop and use problem solving skills before telling yourself this is just the “beginner quality” of your tools or skill level. Practice cutting on scrap.
Wallet pockets are too tight on cards? Before just adding space to your pattern, figure out where you went wrong in designing it in the first place so that when you design another wallet, you don’t make the same mistake again. Do the refining on scrap pieces, not whole wallets.
Is it unusually difficult to do something others appear to do with ease? Before you get frustrated that they must have neglected to mention something, make some coffee and think about what could cause this. My first set of chisels were Weaver chisels that Corter Leather used in his videos, and I had to fight them to get them through. It ended up being that my leather was dry, the surface under my “punch board” was not hard/sturdy enough, my “punch board” was actually a cutting board and much too hard, my chisels were almost immediately dull from this set up, and my mallet was not heavy enough. I made a list of all that could be causing the issue and it turned out to be every problem on the list. I discovered this through trial and error, eliminating one factor after another, but the list is what kept me sane. I had direction.
To summarize: slow down, utilize your scrap, write down what you did, write down what you could try.
Thank you for reading this rambling.
I have not solved every problem in my workshop, but I am learning how to approach problems when I encounter them. I hope that by showing my work along the way it can inform someone else’s experience in some useful way.
-Sierra Mooney
Mooney Leather Goods